1. Cài đặt môi trường:
- Anaconda: Tải và cài đặt tại:
- Tensorflow: Dùng anaconda
- Note:
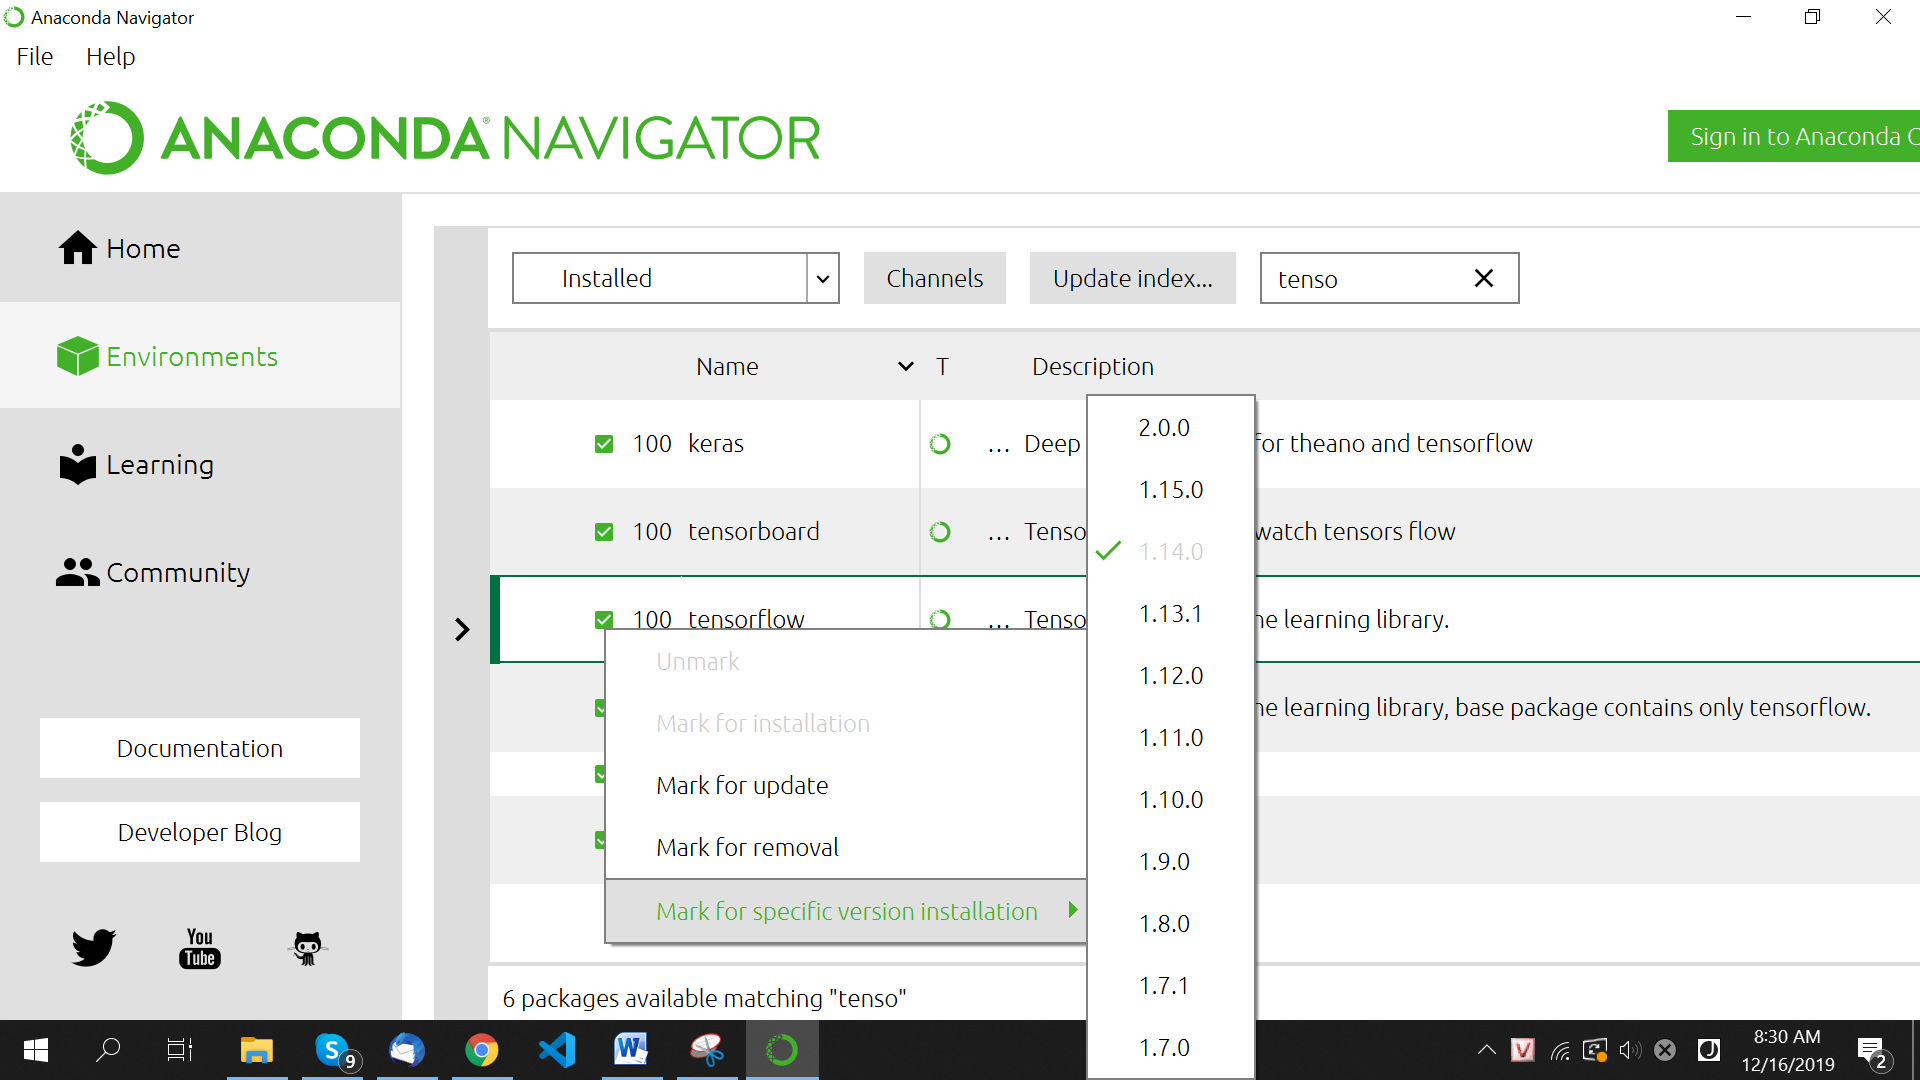 Đổi version TensorFlow bằng Anaconda
2. Phân loại ảnh với model được train sẵn trong Keras:
2.1 Phân loại ảnh với MobileNet:
Đầu tiên cần import model MobileNet được pretrain tích hợp sẵn trong Kerasfrom keras.applications.mobilenet import MobileNetKeras cũng tích hợp thư viện tiền xử lý ảnh, để sử dụng
from keras.preprocessing import imageSau khi phân lớp, đầu ra của net là số thứ tự của lớp (1,2,3,…) nên ta cần decode kết quả tùy thuộc vào bộ dữ liệu sử dụng. Và thư viện tiền xử lý đầu vào của MobileNet
from keras.applications.mobilenet import preprocess_input, decode_predictionsthư viện xử lý array của python
import numpy as npLoad model với weight tương ứng với bộ dữ liệu imagenet
model = MobileNet(weights='imagenet')Load ảnh lên và xử lý trước khi đưa vào để phân lớp
img_path = 'dog.jpg'Vì ở đây ta sử dụng MobileNet input size của model là 224,224, 3 (width, height, channels)
img = image.load_img(img_path, target_size=(224, 224))Ta có thể check input size của model bằng cách:
model.get_layer("InputLayer",0).input_shapeHoặc xem toàn bộ kiến trúc layer của model:
model.summary()Tiền xử lý
x = image.img_to_array(img) x = np.expand_dims(x, axis=0) x = preprocess_input(x)Tiến hành phân lớp
preds = model.predict(x)Giải mã kết quả về dạng list các tuple (lớp, mô tả, xác suất) - (class, description, probability)
decode_predictions(preds, top=3)Kết quả
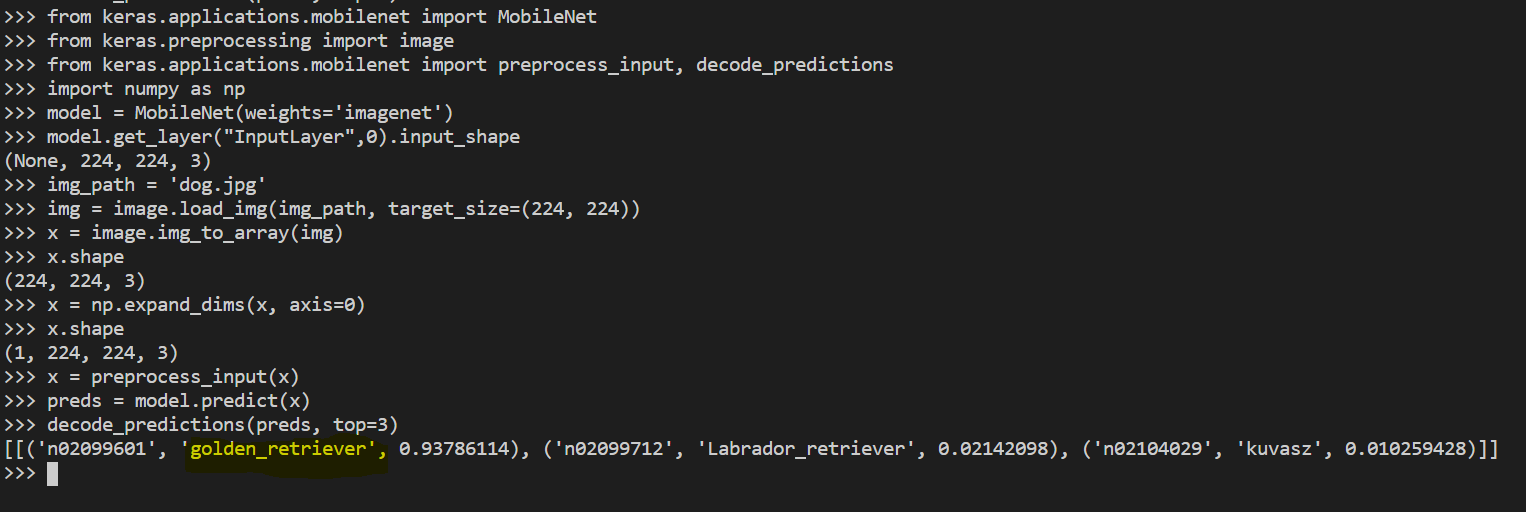 Phân loại ảnh với MobileNet
Ảnh ‘dog.img’ được phân loại thành ‘golden_retriever’:
Phân loại ảnh với MobileNet
Ảnh ‘dog.img’ được phân loại thành ‘golden_retriever’:
 Ảnh input
2.2 Phân loại ảnh với ResNet50:
Tương tự như ResNet50,from keras.applications.resnet50 import ResNet50 from keras.preprocessing import image from keras.applications.resnet50 import preprocess_input, decode_predictions import numpy as np model = ResNet50(weights='imagenet') model.get_layer("InputLayer",0).input_shape img_path = 'dog.jpg' img = image.load_img(img_path, target_size=(224, 224)) x = image.img_to_array(img) x.shape x = np.expand_dims(x, axis=0) x.shape x = preprocess_input(x) preds = model.predict(x) decode_predictions(preds, top=3)
 Phân loại ảnh với resnet50
3. Nhận diện vật thể trong ảnh:
3.1 Nhận diện vật thể với yolov3 đã được train:
Có thể từ trang chủ yolo https://pjreddie.com/darknet/yolo/ tải source về và nhận dạng object. Hoặc dùng yolo như một pretrained model và sử dụng keras để nhận diện.- Load Pre-Trained Yolo Model
- Download weight
- Import thư viện
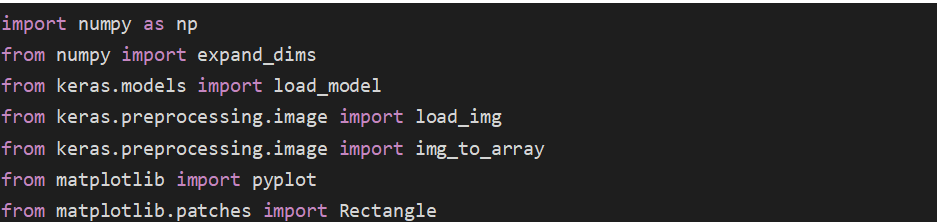
import numpy as np from numpy import expand_dims from keras.models import load_model from keras.preprocessing.image import load_img from keras.preprocessing.image import img_to_array from matplotlib import pyplot from matplotlib.patches import Rectangle
 Load model
model = load_model('C:UsersnghiaDesktopyolo.h5',compile=False)
 Load image
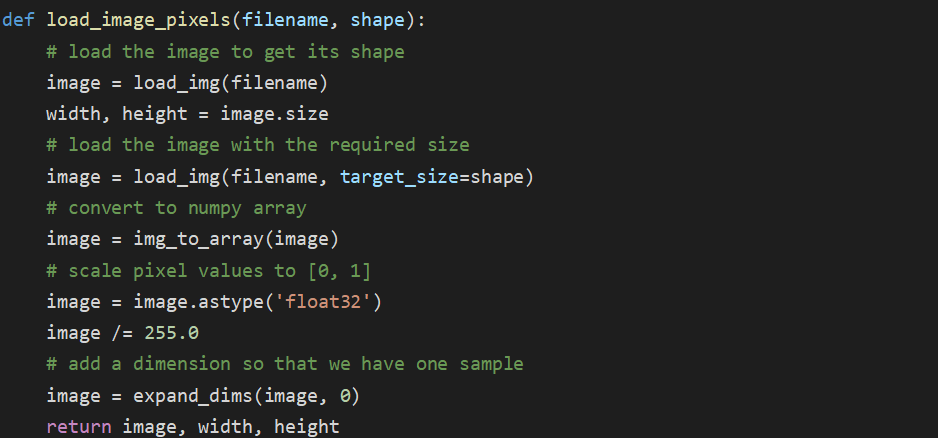
def load_image_pixels(filename, shape): # load the image to get its shape image = load_img(filename) width, height = image.size # load the image with the required size image = load_img(filename, target_size=shape) # convert to numpy array image = img_to_array(image) # scale pixel values to [0, 1] image = image.astype('float32') image /= 255.0 # add a dimension so that we have one sample image = expand_dims(image, 0) return image, width, height
photo_filename = 'C:UsersnghiaDesktopcar.jpg' input_w, input_h = 416, 416 image, image_w, image_h = load_image_pixels(photo_filename, (input_w, input_h))
 Predict và lấy list box của các object được nhận diện trong ảnh, với predict confident > threshold = 0.6
yhat = model.predict(image) anchors = [[116,90, 156,198, 373,326], [30,61, 62,45, 59,119], [10,13, 16,30, 33,23]] class_threshold = 0.6 boxes = list() for i in range(len(yhat)): # decode the output of the network boxes += decode_netout(yhat[i][0], anchors[i], class_threshold, input_h, input_w) # correct the sizes of the bounding boxes for the shape of the image correct_yolo_boxes(boxes, image_h, image_w, input_h, input_w)
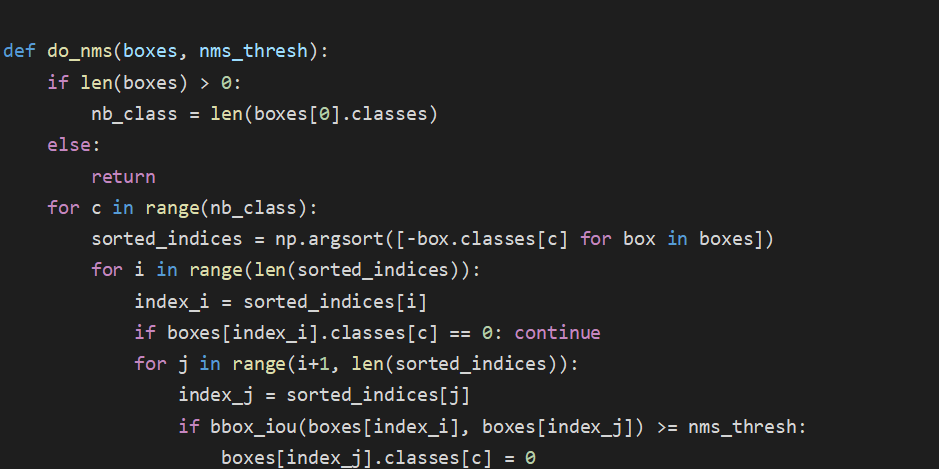
 vì khi lấy các list box sẽ có các box chồng nhau nhận diện cùng một vật thể nên ta cần chọn một box trong số đó
def do_nms(boxes, nms_thresh): if len(boxes) > 0: nb_class = len(boxes[0].classes) else: return for c in range(nb_class): sorted_indices = np.argsort([-box.classes[c] for box in boxes]) for i in range(len(sorted_indices)): index_i = sorted_indices[i] if boxes[index_i].classes[c] == 0: continue for j in range(i+1, len(sorted_indices)): index_j = sorted_indices[j] if bbox_iou(boxes[index_i], boxes[index_j]) >= nms_thresh: boxes[index_j].classes[c] = 0
do_nms(boxes, 0.5)
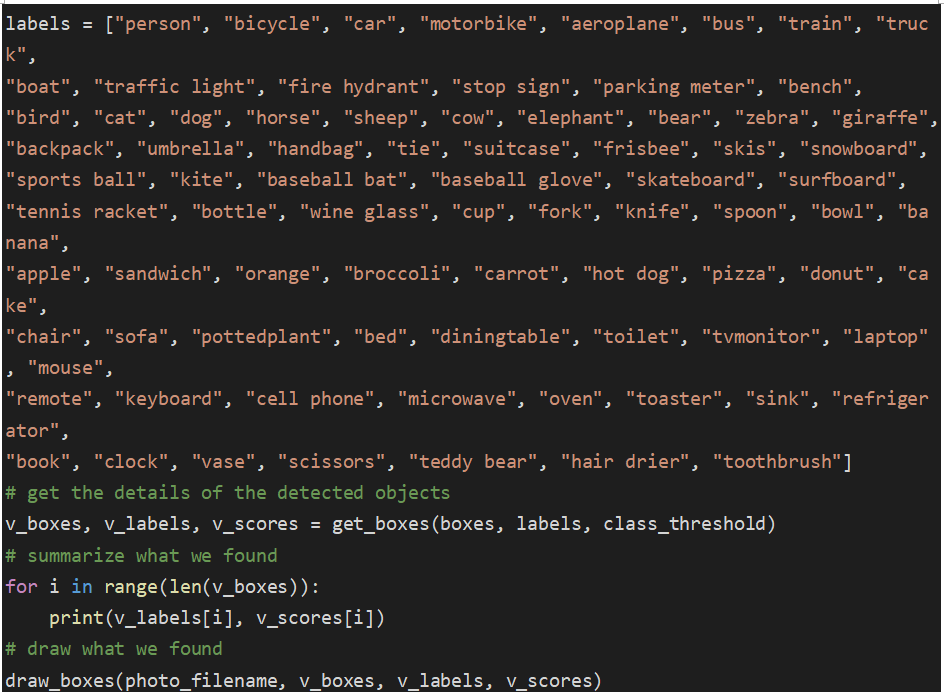
 cuối cũng là dán nhãn và vẽ box cho object được nhận diện
labels = ["person", "bicycle", "car", "motorbike", "aeroplane", "bus", "train", "truck",
"boat", "traffic light", "fire hydrant", "stop sign", "parking meter", "bench",
"bird", "cat", "dog", "horse", "sheep", "cow", "elephant", "bear", "zebra", "giraffe",
"backpack", "umbrella", "handbag", "tie", "suitcase", "frisbee", "skis", "snowboard",
"sports ball", "kite", "baseball bat", "baseball glove", "skateboard", "surfboard",
"tennis racket", "bottle", "wine glass", "cup", "fork", "knife", "spoon", "bowl", "banana",
"apple", "sandwich", "orange", "broccoli", "carrot", "hot dog", "pizza", "donut", "cake",
"chair", "sofa", "pottedplant", "bed", "diningtable", "toilet", "tvmonitor", "laptop", "mouse",
"remote", "keyboard", "cell phone", "microwave", "oven", "toaster", "sink", "refrigerator",
"book", "clock", "vase", "scissors", "teddy bear", "hair drier", "toothbrush"]
# get the details of the detected objects
v_boxes, v_labels, v_scores = get_boxes(boxes, labels, class_threshold)
# summarize what we found
for i in range(len(v_boxes)):
print(v_labels[i], v_scores[i])
# draw what we found
draw_boxes(photo_filename, v_boxes, v_labels, v_scores)
 Kết quả
#/media/File:JewelryDistLA-042801.JPG) Street level in the Jewelry District, on Seventh Street, facing West and the Financial District
Full code:
https://machinelearningmastery.com/how-to-perform-object-detection-with-yolov3-in-keras/
Street level in the Jewelry District, on Seventh Street, facing West and the Financial District
Full code:
https://machinelearningmastery.com/how-to-perform-object-detection-with-yolov3-in-keras/
3.2 Cấu trúc model YOLOv3:
Yolo sử dụng model Darknet-53, một Fully Convolutional Neural Network: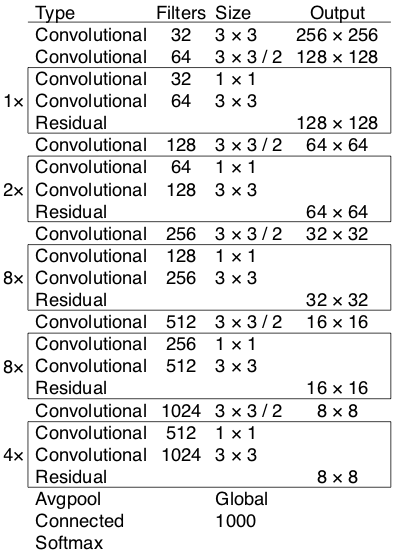 Model Darknet-53
https://medium.com/analytics-vidhya/yolo-v3-theory-explained-33100f6d193
Model Darknet-53
https://medium.com/analytics-vidhya/yolo-v3-theory-explained-33100f6d193
- Input image shape: (m, 416, 416, 3)
- Output: list các bounding boxes (tọa độ box (tọa độ tâm (x,y) + chiều rộng + chiều cao ), xác suất có phải là một object (số thực), xác suất của object nhận diện được với từng class trong bộ class của dataset (coco dataset có 80 class nên sẽ có 80 giá trị tương ứng))
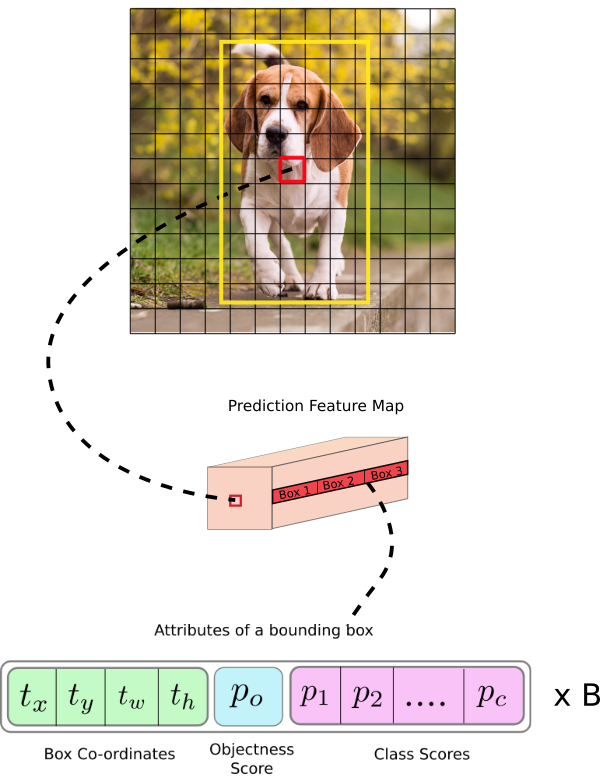 Yolo-v3 theory explained
https://medium.com/analytics-vidhya/yolo-v3-theory-explained-33100f6d193
Yolo-v3 theory explained
https://medium.com/analytics-vidhya/yolo-v3-theory-explained-33100f6d193
4. Nhận diện và training bằng Tensorflow:
4.2. Cài đặt môi trường:
- Cài đặt Anaconda: https://www.anaconda.com/distribution/
- Cài TensorFlow từ conda: mở conda powershell prompt (admin):
- Chạy lệnh: conda install -c conda-forge tensorflow
- Hoặc : conda install -c anaconda tensorflow-gpu (nếu có gpu)
- Kiểm tra:
>>> import tensorflow as tfNếu import không có lỗi thì cài đặt đã thành công.
>>> exit()
- Nếu có GPU thì cài đặt thêm các thư viện hỗ trợ chạy song song:
- Import các package cần thiết:
conda install pillow, lxml, jupyter, matplotlib, opencv, cython, pandas
- Tải về TensorFlow Models: https://github.com/tensorflow/models
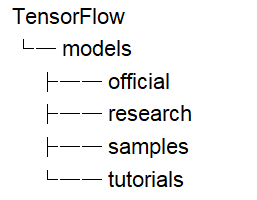 Cấu trúc thư mục 1
- Cài đặt Google Protobuf:
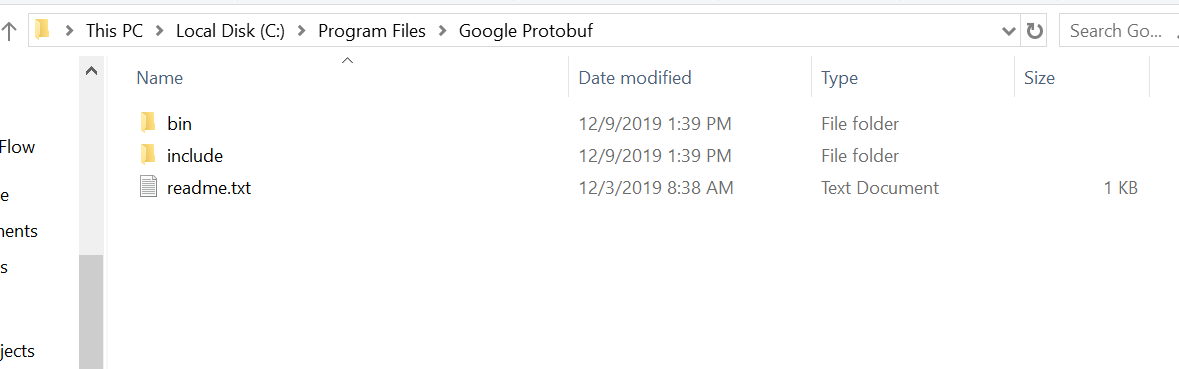 Cài đặt Google Protobuf
Thêm “C:Program FilesGoogle Protobufbin” vào Path environment variable (system).
Vào đường dẫn: TensorFlow/models/research/
Chạy dòng lệnh:
Cài đặt Google Protobuf
Thêm “C:Program FilesGoogle Protobufbin” vào Path environment variable (system).
Vào đường dẫn: TensorFlow/models/research/
Chạy dòng lệnh:
protoc object_detection/protos/*.proto --python_out=.
- Thêm path vào Environment Variables (system): [D:YourPath]Tensorflowmodelsresearchobject_detection
python setup.py build
 python setup.py build
python setup.py install
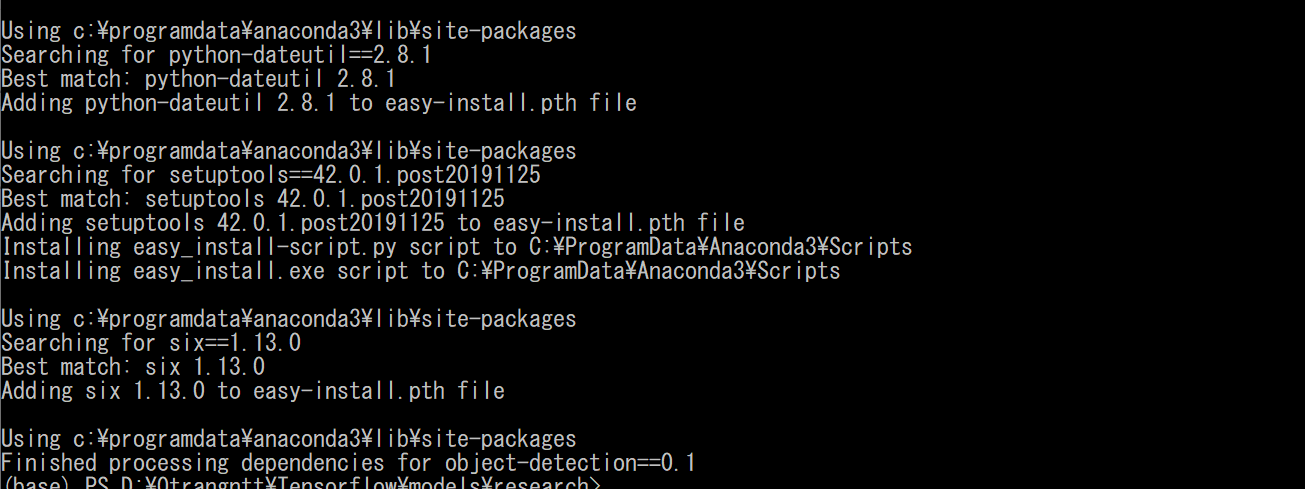 python setup.py install
- Cài LabelImg: tải https://github.com/tzutalin/labelImg
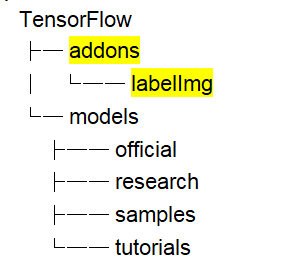 Cấu trúc thư mục 2
Cài thêm package:
Cấu trúc thư mục 2
Cài thêm package:
conda install pyqt=4 conda install lxml pyrcc4 -py3 -o resources.py resources.qrc(hoặc:
conda install pyqt=5 conda install lxml pyrcc5 -o resources.py resources.qrc) Kiểm tra cài đặt labelImg bằng cách: vào thư mục TensorFlowaddonslabelImg Chạy:
python labelImg.pyKết quả được giao diện tool labelImg
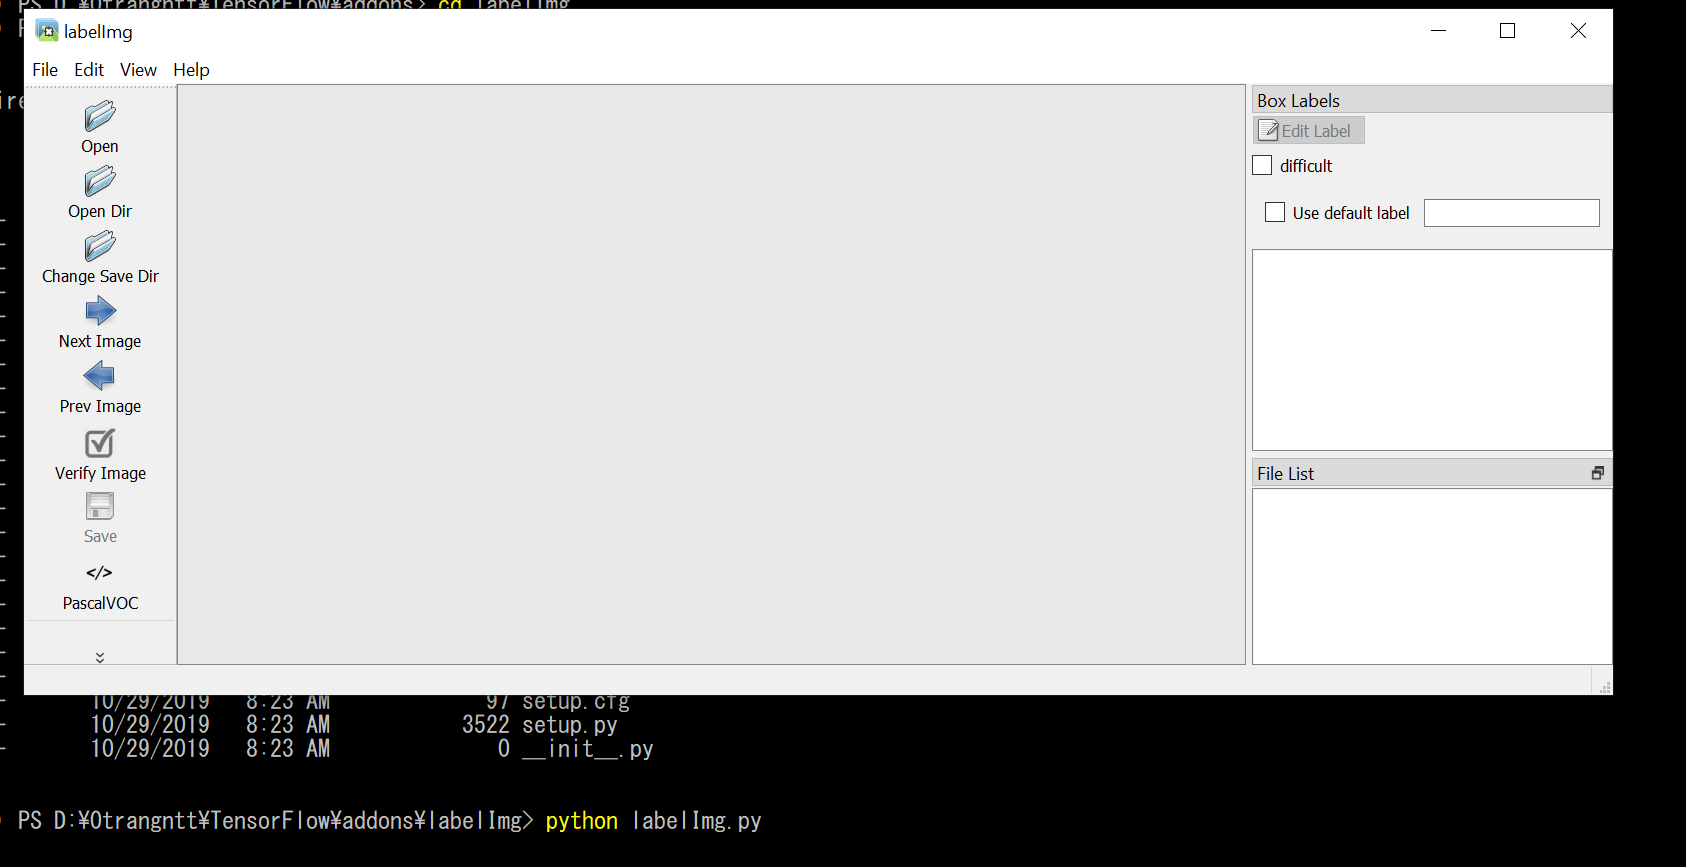 Giao diện tool labelImg
4.3. Training:
- Tạo thư mục workspace: tạo các folder như bên dưới:
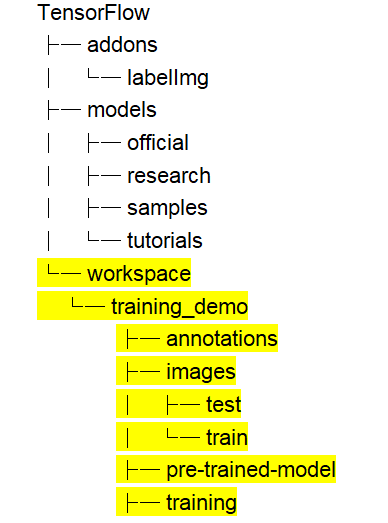 Cấu trúc thư mục 3
- Tạo tập dataset:
- Chuẩn bị các ảnh để làm dataset trong folder images, thông thường tỉ lệ số ảnh train/test gần bằng 90%/10%.
- Vào đường dẫn: TensorflowaddonslabelImg
- Chạy labelImg:
python labelImg.py ....workspacetraining_demoimages
- Ta sử dụng tool để gán nhãn cho các object trong hình.
 Sử dụng tool labelImg
- Tạo file label_map trong thư mục “training_demoannotations” đặt tên là label_map.pbtxt
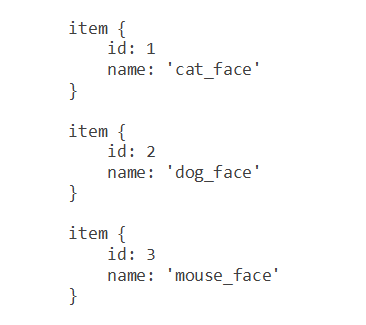
- Tạo TensorFlow Records:
- Tạo thư mục script:
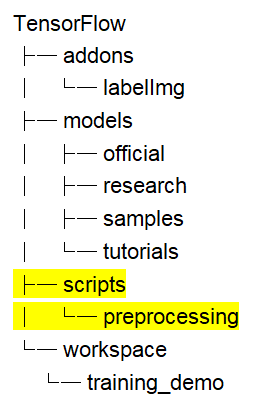 Cấu trúc thư mục 4
- Tiến hành đổi file *.xml sang *.csv:
python xml_to_csv.py -i [PATH_TO_IMAGES_FOLDER]/train -o [PATH_TO_ANNOTATIONS_FOLDER]/train_labels.csv
python xml_to_csv.py -i [PATH_TO_IMAGES_FOLDER]/test -o [PATH_TO_ANNOTATIONS_FOLDER]/test_labels.csv
# ví dụ python xml_to_csv.py –i C:TensorFlowworkspacetraining_demoimagestrain -o C:TensorFlowworkspacetraining_demoannotationstrain_labels.csv python xml_to_csv.py -i C:TensorFlowworkspacetraining_demoimagestest -o C:TensorFlowworkspacetraining_demoannotationstest_labels.csvNếu thành công, ta được 2 file test_labels.csv và train_labels.csv trong “TensorFlowworkspacetraining_demoannotations”
- Tiến hành đổi file *.csv sang *.record:
python generate_tfrecord.py --label=<LABEL> --csv_input=<PATH_TO_ANNOTATIONS_FOLDER>/train_labels.csv --img_path=<PATH_TO_IMAGES_FOLDER>/train --output_path=<PATH_TO_ANNOTATIONS_FOLDER>/train.record
# Create test data: python generate_tfrecord.py --label=<LABEL> --csv_input=<PATH_TO_ANNOTATIONS_FOLDER>/test_labels.csv --img_path=<PATH_TO_IMAGES_FOLDER>/test --output_path=<PATH_TO_ANNOTATIONS_FOLDER>/test.record
# For example python generate_tfrecord.py --label=ship --csv_input=C:TensorFlowworkspacetraining_demoannotationstrain_labels.csv --output_path=C:TensorFlowworkspacetraining_demoannotationstrain.record --img_path=C:TensorFlowworkspacetraining_demoimagestrain python generate_tfrecord.py --label=ship --csv_input=C:TensorFlowworkspacetraining_demoannotationstest_labels.csv --output_path=C:TensorFlowworkspacetraining_demoannotationstest.record --img_path=C:TensorFlowworkspacetraining_demoimagestestNếu thành công, ta được 2 file test.record và train.record trong “TensorFlowworkspacetraining_demoannotations” NOTE: Nếu dataset có 2 label trở lên code nên thay dòng 29:
flags.DEFINE_string('label', '', 'Name of class label')thành
flags.DEFINE_string('label0', '', 'Name of class[0] label') flags.DEFINE_string('label1', '', 'Name of class[1] label') flags.DEFINE_string('label2', '', 'Name of class[2] label') …Thay dòng 43:
if row_label == FLAGS.label: # 'ship': return 1bằng
if row_label == FLAGS.label0: return 1 elif row_label == FLAGS.label1: return 2 elif row_label == FLAGS.label2: return 3 else: NoneVà thêm khai báo khi chạy lệnh
python generate_tfrecord.py --label0=<LABEL0> --label1=<LABEL1> --label2=<LABEL2> --csv_input=<PATH_TO_ANNOTATIONS_FOLDER>/train_labels.csv --img_path=<PATH_TO_IMAGES_FOLDER>/train --output_path=<PATH_TO_ANNOTATIONS_FOLDER>/train.recordVí dụ
python generate_tfrecord.py --label0=dog --label1=cat --label2=fox --csv_input=C:TensorFlowworkspacetraining_demoannotationstrain_labels.csv --output_path=C:TensorFlowworkspacetraining_demoannotationstrain.record --img_path=C:TensorFlowworkspacetraining_demoimagestrain
- Tạo model:
- Sử dụng model : ssd_inception_v2_coco (hoặc bất cứ model nào)
- Tạo file config ssd_inception_v2_coco.config tại “training_demo/training”:
9 : num_classes: 1 # Set this to the number of different label classes 77 : type: 'ssd_inception_v2' # Set to the name of your chosen pre-trained model 136: batch_size: 12 # Increase/Decrease this value depending on the available memory (Higher values require more memory and vice-versa) 151: fine_tune_checkpoint: "pre-trained-model/model.ckpt" # Path to extracted files of pre-trained model 170: input_path: "annotations/train.record" # Path to training TFRecord file 172: label_map_path: "annotations/label_map.pbtxt" # Path to label map file 184: input_path: "annotations/test.record" # Path to testing TFRecord 186: label_map_path: "annotations/label_map.pbtxt" # Path to label map file
- Training:
- Copy file “TensorFlow/models/research/object_detection/legacy/train.py” và “TensorFlow/models/research/object_detection/export_inference_graph.py” vào thư mục “training_demo”.
- Cd vào thư mục “training_demo”
python train.py --logtostderr --train_dir=training/ --pipeline_config_path=training/ssd_inception_v2_coco.configNếu thành công, data sẽ được training
 Training data
Vì model và file checkpoint sẽ được update liên tục, nên ta sẽ ngắt training khi được độ loss như ý (thông thường là gần bằng 1 hoặc <1).
Training data
Vì model và file checkpoint sẽ được update liên tục, nên ta sẽ ngắt training khi được độ loss như ý (thông thường là gần bằng 1 hoặc <1).
- Export Trained Inference Graph
python export_inference_graph.py --input_type image_tensor --pipeline_config_path training/ssd_inception_v2_coco.config --trained_checkpoint_prefix training/model.ckpt-13302 --output_directory trained-inference-graphs/output_inference_graph_v1.pbNếu thành công, ta được file “output_inference_graph_v1.pb” tại “trained-inference-graphs”. Và dùng file này để detect object.
4.4. Detect Objects:
Chạy python: Import thư viện cần thiết:import numpy as np import tensorflow as tf from matplotlib import pyplot as plt from PIL import Image import cv2 from utils import label_map_util from utils import visualization_utils as vis_util
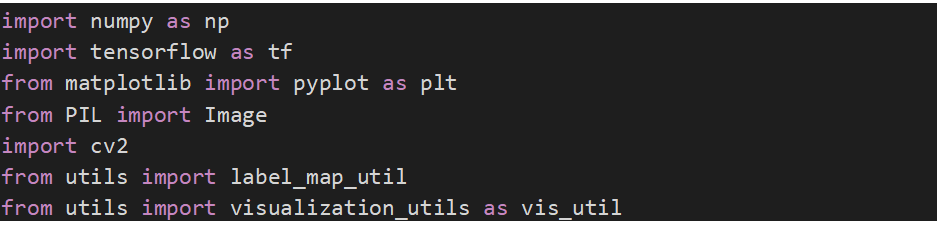 Set dường dẫn file model bằng đường dẫn của model đã train được và file label_map
Hoặc dùng bất kỳ pretrained model nào (download pretrained model ở đây :
https://github.com/tensorflow/models/blob/master/research/object_detection/g3doc/detection_model_zoo.md )
Set dường dẫn file model bằng đường dẫn của model đã train được và file label_map
Hoặc dùng bất kỳ pretrained model nào (download pretrained model ở đây :
https://github.com/tensorflow/models/blob/master/research/object_detection/g3doc/detection_model_zoo.md )
PATH_TO_LABELS = "D:label_map.pbtxt" PATH_TO_CKPT = "D:frozen_inference_graph.pb"
 Set số class
NUM_CLASSES = 3
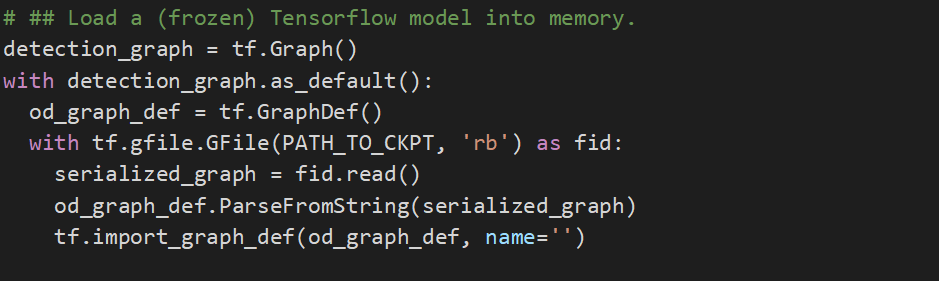
 Load model
# ## Load a (frozen) Tensorflow model into memory. detection_graph = tf.Graph() with detection_graph.as_default(): od_graph_def = tf.GraphDef() with tf.gfile.GFile(PATH_TO_CKPT, 'rb') as fid: serialized_graph = fid.read() od_graph_def.ParseFromString(serialized_graph) tf.import_graph_def(od_graph_def, name='')
 load label map
# ## Loading label map label_map = label_map_util.load_labelmap(PATH_TO_LABELS) categories = label_map_util.convert_label_map_to_categories(label_map, max_num_classes=NUM_CLASSES, use_display_name=True) category_index = label_map_util.create_category_index(categories)
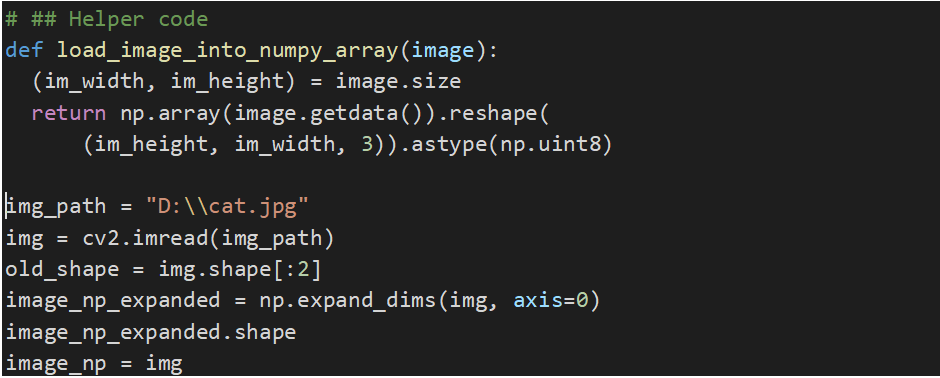
 tạo function đọc ảnh:
# ## Helper code def load_image_into_numpy_array(image): (im_width, im_height) = image.size return np.array(image.getdata()).reshape( (im_height, im_width, 3)).astype(np.uint8)Đọc ảnh
img_path = "D:cat.jpg" img = cv2.imread(img_path) old_shape = img.shape[:2] image_np_expanded = np.expand_dims(img, axis=0) image_np_expanded.shape image_np = img
 Nhận diện
with detection_graph.as_default(): with tf.Session(graph=detection_graph) as sess: image_np_expanded = np.expand_dims(image_np, axis=0) image_tensor = detection_graph.get_tensor_by_name('image_tensor:0') image_tensor = detection_graph.get_tensor_by_name('image_tensor:0') # Extract detection boxes boxes = detection_graph.get_tensor_by_name('detection_boxes:0') # Extract detection scores scores = detection_graph.get_tensor_by_name('detection_scores:0') # Extract detection classes classes = detection_graph.get_tensor_by_name('detection_classes:0') # Extract number of detectionsd num_detections = detection_graph.get_tensor_by_name( 'num_detections:0') # Actual detection. (boxes, scores, classes, num_detections) = sess.run( [boxes, scores, classes, num_detections], feed_dict={image_tensor: image_np_expanded})
print(boxes, scores, classes, num_detections) # Visualization of the results of a detection. vis_util.visualize_boxes_and_labels_on_image_array( image_np, np.squeeze(boxes), np.squeeze(classes).astype(np.int32), np.squeeze(scores), category_index, use_normalized_coordinates=True, line_thickness=8)
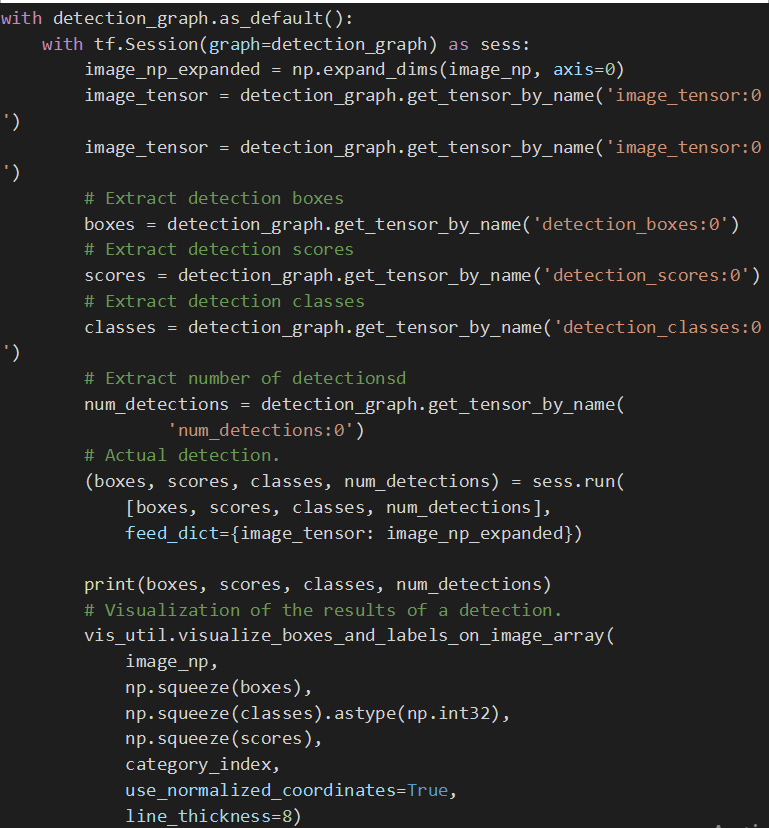
scale = 800 cv2.imshow('object detection', cv2.resize(image_np,(scale,int(old_shape[0]*scale/old_shape[1])))) cv2.waitKey(0); cv2.destroyAllWindows(); cv2.waitKey(1)
 kết quả
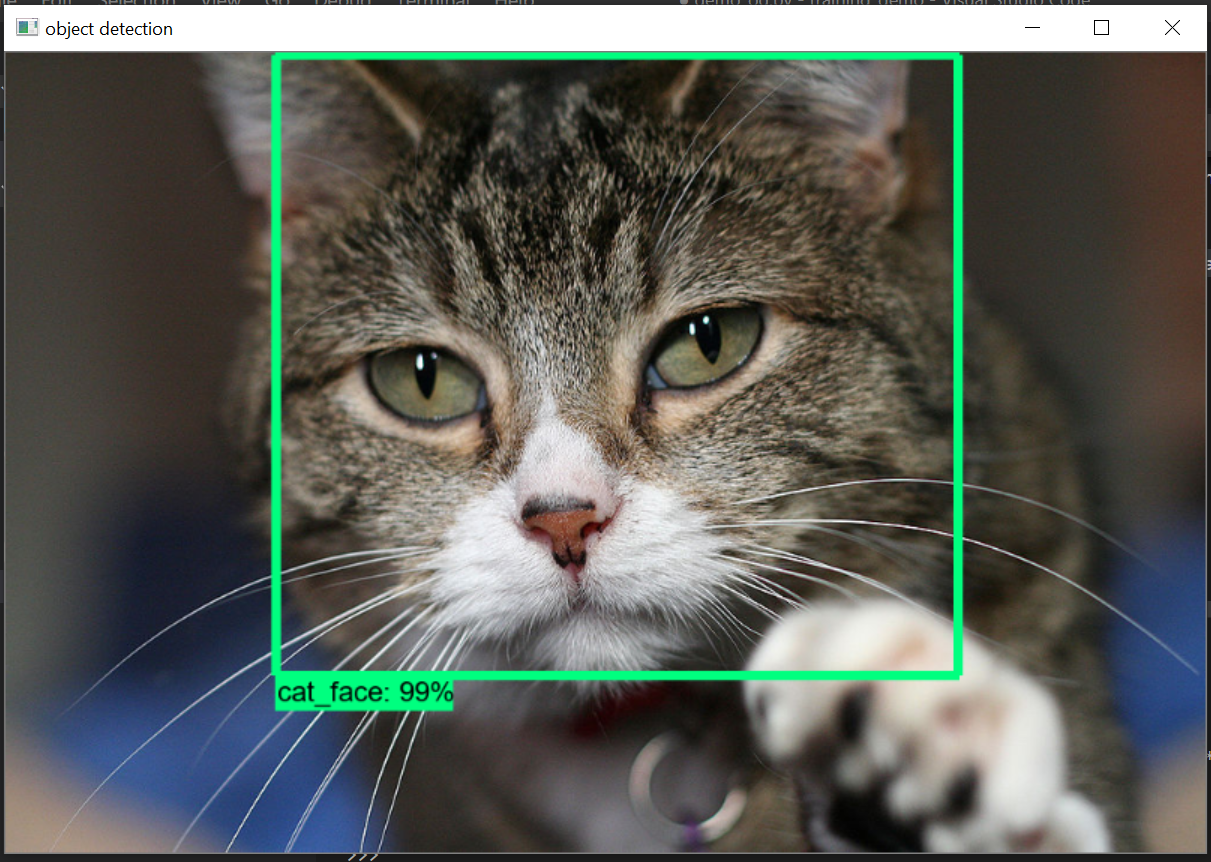 Kết quả nhận diện 1
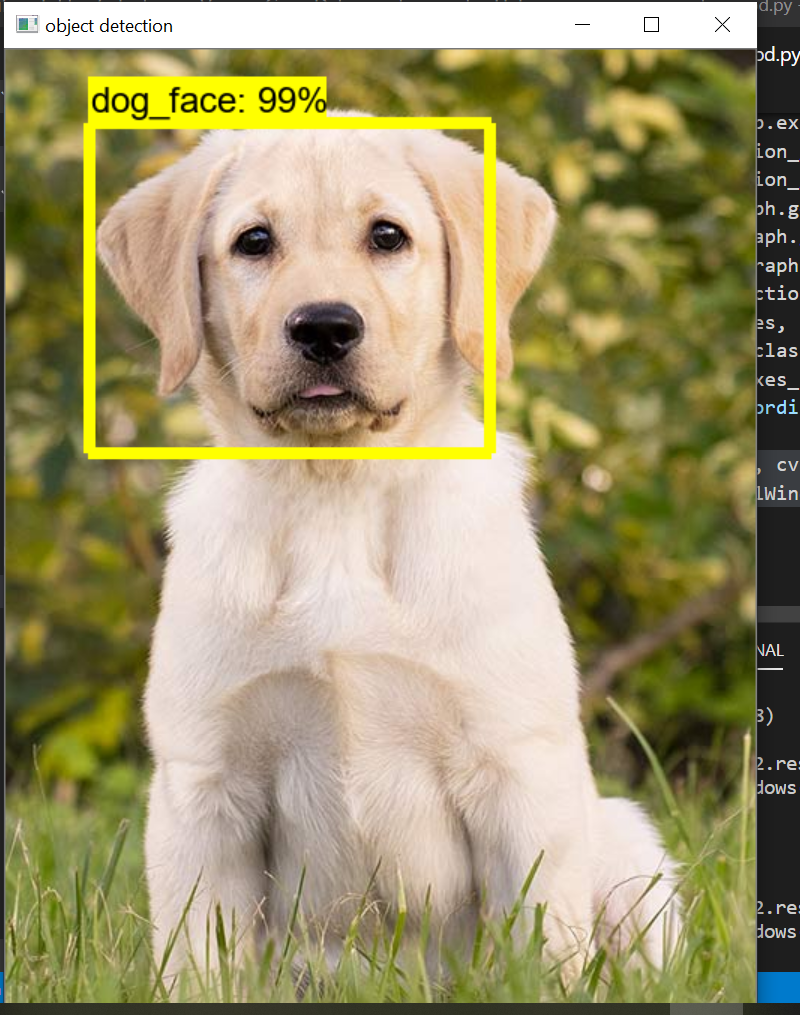 Kết quả nhận diện 2
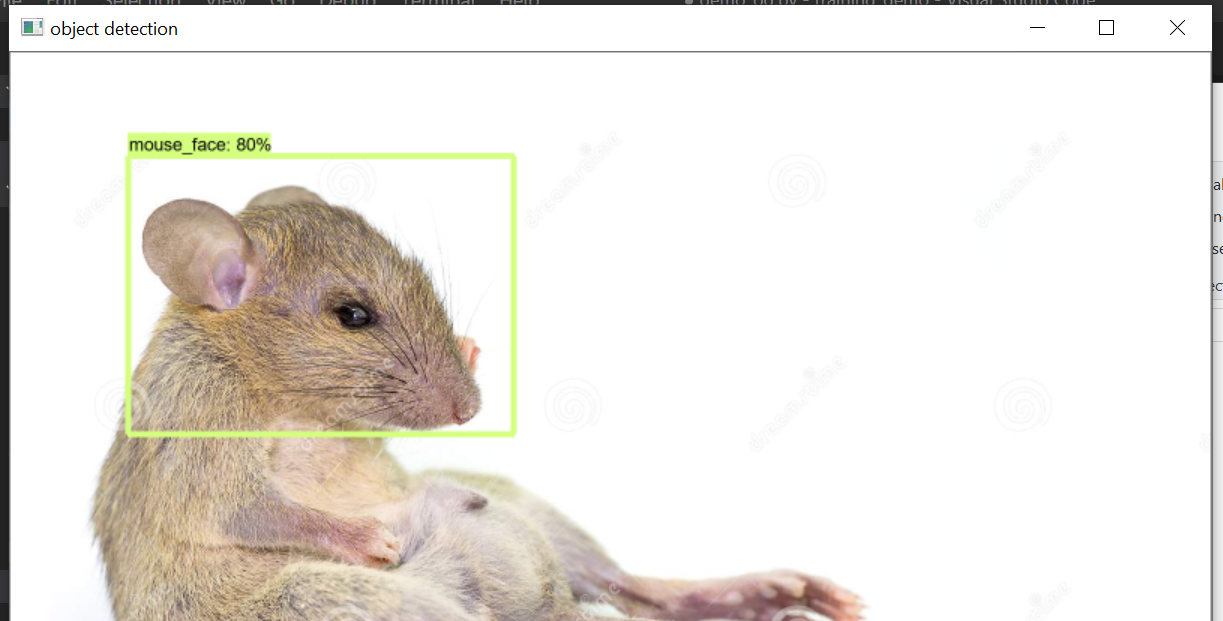 Kết quả nhận diện 3
4.6. Sử dụng TensorBoard:
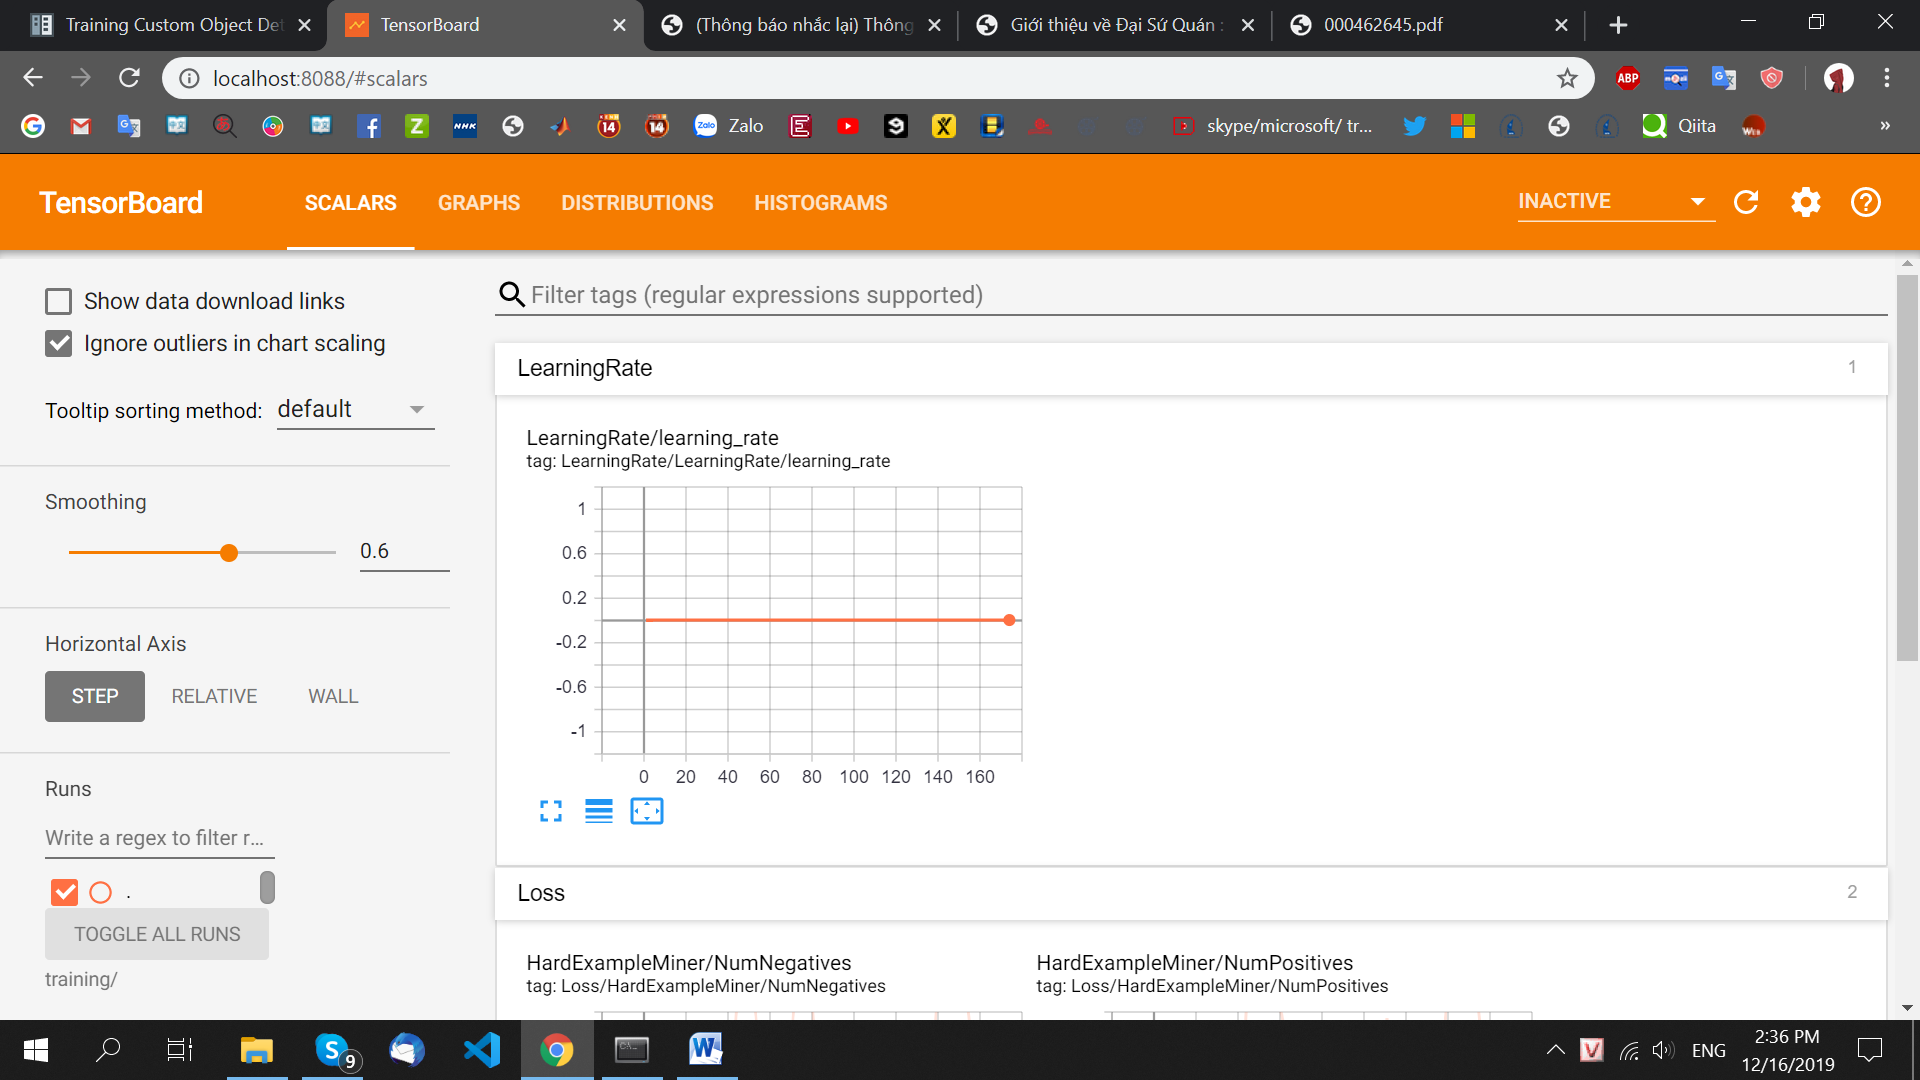
TensorBoard là công cụ giúp theo dõi và vẽ đồ thị loss, accuracy hỗ trợ việc theo dõi quá trình learning của máy. Cài đặt: cài tensorboard thông qua conda prompt: (https://anaconda.org/conda-forge/tensorboard) Nhập lệnh:conda install -c conda-forge tensorboardSử dụng: Cd vào thư mục training_demo, chạy lệnh:
tensorboard --logdir=training/ --host localhost --port 8088
 tensorBoard
Mở http://localhost:8088/ bằng browser:
tensorBoard
Mở http://localhost:8088/ bằng browser:
 Sử dụng TensorBoard